List of All Hidden Samsung Secret Codes 2016

Samsung Secret Codes List 2016

List of Samsung Secret Codes 2016:

Today post is totally dedicated to Samsung mobile users. if you are also using Samsung handset then you must need to know Samsung Secret Codes. These codes have specific functionality and commonly used by experts or Mobile developers. These codes help you to test and restore your Mobile internal functionality and much more. bellow is the list of all tested and useful secret codes for Samsung Mobile phones used by shopkeepers as well as experts. 

NOTE: To use these codes, you just need to open phone keypad or dialer app and type the code. As soon as you finish typing the code, it'll automatically execute and show the required information.
Samsung Secret Codes List 2016

  • Software version: *#9999#
  • IMEI number: *#06#
  • Serial number: *#0001#
  • Battery status- Memory capacity : *#9998*246#
  • Debug screen: *#9998*324# – *#8999*324#
  • LCD kontrast: *#9998*523#
  • Vibration test: *#9998*842# – *#8999*842#
  • Alarm beeper – Ringtone test : *#9998*289# – *#8999*289#
  • Smiley: *#9125#
  • Software version: *#0837#
  • Display contrast: *#0523# – *#8999*523#
  • Battery info: *#0228# or *#8999*228#
  • Display storage capacity: *#8999*636#
  • Display SIM card information: *#8999*778#
  • Show date and alarm clock: *#8999*782#
  • The display during warning: *#8999*786#
  • Samsung hardware version: *#8999*837#
  • Show network information: *#8999*638#
  • Display received channel number and received intensity: *#8999*9266#
  • S/W Version *#1111# 
  • Firmware Version *#1234# 
  • H/W Version *#2222# 
  • All Versions Together *#8999*8376263# 
  • Test Menu *#8999*8378# 
  • GPSR Tool *#4777*8665# 
  • LCD Brightness *#8999*523# 
  • Error LOG Menu *#8999*377# 
  • EEP Menu *#8999*327# 
  • Debug Mode *#8999*667# 
  • PhoneModel (Wap) *#92782# 
  • JAVA Mode #*5737425# 
  • Call List *#2255# 
  • Bluetooth MAC Adress *#232337# 
  • Java Version *#5282837# 
  • Samsung A300 to reset the language *#0000# 
  • Master reset(unlock) #*7337# 
  • Incremental Redundancy #*4773# 
  • Reset wakeup & RTK timer cariables/variables #*7785# 
  • Tone Generator Mute #*7200# 
  • BLUETOOTH Test mode #*3888# 
  • Task screen #*7828# 
  • S/W Version & H/W Version #*#8377466# 
  • Restarts Phone #*2562# 
  • No Blocking? General Defense #*2565# .
  • General Defense, Code Erased#*3353# 
  • Phone Hangs on White screen #*3837# .
  • Restarts Phone #*3849# 
  • Restarts Phone (Resets Wap Settings) #*7337# 
  • AutoAnswer ON/OFF #*2886# 
  • GPRS Detached/Attached #*7288#
  • GPRS Attached # *7287# 
  • White Screen #*7666# 
  • Sleep Deactivate/Activat #*7693# e
  • Databattery #*2286# 
  • GPRS switching set to (Class 4, 8, 9, 10) #*2527#
  • Copycat feature Activa/Deactivate #*2679# 
  • External looptest 9600 bps #*3940# 
  • Handsfree mode Activate/Deactivate #*4263#
  • Time ON #*2558# 
  • External looptest 115200 bps #*3941# 
  • SIM Phase #*7462# 
  • Voltage/Freq #*7983# 
  • Voltag #*7986# e
  • Call Failed #*2255# 
  • DELETE ALL SMS!!!#*5376# 
  • Permanent Registration Beep #*2337# 
  • Charging Duration #*2474# 
  • Audio Path (Handsfree) #*2834# 
  • DCS Support Activate/Deactivate #*3270# 
  • Data Activate/Deactivate #*3282# 
  • EGSM Activate/Deactivate #*3476#
  • FORMAT FLASH VOLUME!!! #*3676# 
  • GSM Activate/Deactivate #*4760#
  • White Screen #*4864# 
  • Accessory #*7326# 
  • Sleep variable #*7683# 
  • Blinks 3D030300 in RED #*3797# 
  • Resetting the time to DPB variables #*7372# 
  • RLC bitmap compression Activate/Deactivate #*7722# 
  • Blinks 1347E201 in RED #*2351# 
  • Switch to 2 inner speaker #*2775# 
  • AMR REC STAR #*22671# T
  • Pause REC #*22673# 
  • Resume REC #*22674# 
  • AMR Playback #*22675# 
  • AMR Stop Play #*22676# 
  • Pause Play #*22677# 
  • Resume Play #*22678# 
  • PCM Rec Req #*77261#
  • Stop PCM Rec #*77262# 
  • Playback #*77263# PCM
  • PCM Stop Play #*77264# 
  • AMR Get Time #*22679# 
  • Watchdog ON/OFF *#8999*364# 
  • WATCHDOG signal route setup *#8999*427#
  • Full Reset (Caution every stored data will be deleted.) *2767*3855#
  • Custom Rese*2767*2878# 
  • Wap Reset*2767*927# 
  • Camera Reset (deletes photos) *2767*226372# 
  • Reset Mobile TV *2767*688# 
  • RAM Dump (On or Off) #7263867# 
  • Germany WAP Settings *2767*49927# 
  • UK WAP Settings *2767*44927# = 
  • Netherlands WAP Settings *2767*31927#  
  • Czech WAP Settings *2767*420927# = 
  • Austria WAP Settings *2767*43927# 
  • Italy WAP Settings *2767*39927# 
  • France WAP Settings *2767*33927# 
  • Portugal WAP Settings *2767*351927# 
  • Spain WAP Settings *2767*34927# 
  • Sweden WAP Settings *2767*46927#
  • Ukraine WAP Settings *2767*380927# 
  • Russia WAP Settings *2767*7927# 
  • GREECE WAP Settings *2767*30927# 
  • WAP Settings Reset *2767*73738927# 
  • Germany MMS Settings *2767*49667# 
  • UK MMS Settings *2767*44667#  
  • Netherlands MMS Settings *2767*31667# 
  • Czech MMS Settings *2767*420667# 
  • Austria MMS Settings *2767*43667# 
  • Italy MMS Settings *2767*39667# 
  • France MMS Settings *2767*33667# 
  • Portugal MMS Settings *2767*351667#
  • Spain MMS Settings *2767*34667# 
  • Sweden MMS Settings *2767*46667# 
  • Russia MMS Settings *2767*7667#. 
  • GREECE MMS Settings *2767*30667# 
  • Check the phone lock status *#7465625# 
  • Enables Network lock *7465625*638*Code# 
  • Disables Network lock #7465625*638*Code# 
  • Enables Subset lock *7465625*782*Code# 
  • Disables Subset lock #7465625*782*Code# 
  • Enables SP lock *7465625*77*Code# 
  • Disables SP lock #7465625*77*Code# 
  • Enables CP lock *7465625*27*Code# 
  • Disables CP lock #7465625*27*Code# 
  • Enables SIM lock *7465625*746*Code# 
  • Disables SIM lock #7465625*746*Code# 
  • Activa lock ON *7465625*228# 
  • Activa lock OFF#7465625*228#  
  • Auto Network lock ON *7465625*28638# 
  • Auto Network lock OFF #7465625*28638# 
  • Auto subset lock ON *7465625*28782#
  • Auto subset lock OFF #7465625*28782# 
  • Auto SP lock ON *7465625*2877# 
  • Auto SP lock OFF #7465625*2877# 
  • Auto CP lock ON *7465625*2827# 
  • Auto CP lock OFF #7465625*2827#
  • Auto SIM lock ON *7465625*28746# 
  • Auto SIM lock OFF #7465625*28746# 


DISCLAIMER: "This information is intended for experienced users. It is not intended for basic users, hackers, or mobile thieves. Please do not try any of following methods if you are not familiar with mobile phones. We'll not be responsible for the use or misuse of this information, including loss of data or hardware damage. So use it at your own risk."


i hope you like these Samsung Secret Codes very much. Feel free to share it with your friends and family. if you have more secret code feel free to share it with us via comments.

Windows 7 Ultimate ISO Download Free Full Version


Windows 7 Ultimate ISO Incl Aug 2016 Updates Free Download Latest OEM RTM version. It is Full Bootable ISO Image of Windows 7 Ultimate ISO Incl Aug 2016.


 Windows 7 Ultimate ISO Incl Aug 2016 Updates Overview
Hello Friends, Today I am going to Share Windows 7 Ultimate ISO Download Free Full Version diricet Link. All  of the Windows editions introduced till date Windows 7 is the most famous and widely used edition. Windows XP is another edition which made its mark with smooth operation and stability and is still being used but Windows 7 has replaced it with some staggering features. Tough we are in Windows 10 era but still majority of people prefer to use Windows 7.
Windows 7 Ultimate ISO Download Free Full Version


The popularity of Windows 7 can be judged by the fact that people have downgraded from Windows 8 and 8.1. Windows 7 has got an enhanced Windows Media Center with awesome new looks. In Windows Media Center you can enjoy watching full HD movies. You can also enjoy listening to your favorite music as well as you can also enjoy slideshows of your favorite moments in the form of images. Desktop navigation has also been improved and has become smoother. Windows Firewall has become more and more secure with inbound/outbound firewall rules. Windows 7 Ultimate with Aug 2016 Updates has got Internet Explorer 11 with enhanced web browsing plus it has also got Windows Defender Updates for improving your security. This update also include .NET Framework 4.6.2 v4.6.01590


Windows 7 Ultimate ISO Download Free Full Version


Features of Windows 7 Ultimate ISO Incl Aug 2016 Updates:

Below are some noticeable features which you’ll experience after Windows 7 Ultimate ISO Incl Aug 2016 Updates free download
  • Got enhanced Windows Media Center.
  • Can enjoy watching HD movies. 
  • Improved Desktop navigation. 
  • More secure than ever Windows Firewall. 
  • Got Internet Explorer 11. Got Windows Defender Updates. 
  • Includes .NET Framework 4.6.2 v4.6.01590.

Windows 7 Ultimate ISO Download Free Full Version


Windows 7 Ultimate ISO Incl Aug 2016 Updates Technical Setup Details:

  • Software Full Name: Windows 7 Ultimate ISO Incl Aug 2016 Updates Setup File 
  • Name: W7ULT.X86X64.en-US.Aug2016.iso Full 
  • Setup Size: 3.8 GB 
  • Setup Type: Offline Installer / Full Standalone Setup 
  • Compatibility Architecture: 32 Bit (x86) / 64 Bit (x64) 
  • Latest Version Release Added On: 03rd Sep 2016 Developers: Windows Homepage

System Requirements For Windows 7 Ultimate ISO Incl Aug 2016 Updates

Before you start Windows 7 Ultimate ISO Incl Aug 2016 Updates free download, make sure your PC meets minimum system requirements.
  • Memory (RAM): 1 GB 
  • Hard Disk Space: 16 GB 
  • Processor: Intel Pentium 4 or later. 

Windows 7 Ultimate ISO Incl Aug 2016 Updates Free Download:

Click on below button to start Windows 7 Ultimate ISO Incl Aug 2016 Updates Free Download. This is complete offline installer and standalone setup for Windows 7 Ultimate ISO Incl Aug 2016 Updates. This would be compatible with both 32 bit and 64 bit windows.

The Best Places to Create a free Website or Blog

The best blogging platforms Create a free website
Blogging is one of the most effective ways for large and small businesses to generate new leads that convert into sales and revenue. There are countless success stories of entrepreneurs and businesses turning their ideas into multi-million dollar enterprises via blogging, although there are other reasons for starting a blog.
The best part is that anyone can start a blog for free. There are dozens of free blogging sites, but not all platforms are created equal and some offer better opportunities for growth, exposure, and monetization. While self-hosted blogs require a unique domain and hosting company, they do offer huge advantages over even the best free blog sites.

Start Free Blog Sites

How To Choose A Blogging Platform:

Below is a comparison of the top free blogging platforms, details of their pros and cons, and why they’re the best free blog sites. To be comprehensive, we reviewed Sites WordPress, Blogger and Tumblr.

The Best Places to Create a free Website or Blog


WordPress.com:
How hot is WordPress? Well, 1 in 6 websites in the world run on it, making it the most popular blogging platform. In addition to being a great free publishing tool and search-engine friendly content management system (CMS), WordPress works for everyone from amateur bloggers to large-scale businesses primarily because it offers a vast array of paid and free custom themes and plugins. This makes WordPress highly flexible, scalable, user friendly, and search engine optimized. In my opinion, WordPress is the best blogging software available.
As a user, you have the option of building a blog at WordPress.com (not recommended) or creating a self-hosted WordPress blog on your own server and domain using WordPress.org (highly recommended).
If you’re interested in ever making money blogging, offering freelance services, or turning your blog into a business, then you absolutely need to pay for web hosting. With a self-hosted WordPress blog, you can make money by setting up banner ads, inserting affiliate links, selling products, creating online courses, or any other way you want to monetize your blog. You have complete control of your website, including design, functionality, and user experience.

Pros:
  • Flexibility: You can run anything on WordPress, ranging from a mommy or food blog to an e-commerce store selling products, gifts or jewelry.
  • Price: The WordPress software is free and you only pay server and domain costs.
  • Reliability: WordPress has a team constantly updating its software and security.
  • Variety and Customization: WordPress is open-source, therefore encouraging developers to build thousands of custom themes and plugins. Because of this, WordPress is almost completely customizable.


Cons:
  • Hosting: To get the most out of WordPress and its features, you must host it on your server. This adds domain and hosting costs, but if you plan on making money online as a blogger or freelancer, a self-hosted WordPress site is a great long-term investment.
  • Coding: Sometimes customization demands a little coding, although you can have a beautiful WordPress site right out of the box. After all, WP does have over 3,000 designs to choose from.

The Bottom Line
If you want to start a blog with a clean, professional design, WordPress offers the best combination of tools. While there is a learning curve, not all blogging platforms are as intuitive and powerful as WordPress. Just remember that, to really make money online as a blogger, you must buy hosting and create a self-hosted WordPress blog.


Blogger.com:
One of the first blogging platforms, Blogger was formerly known as BlogSpot. This Google-owned service is most popular among casual bloggers who write or share online for fun. Blogger is best-known for its instant setup and easy-to-use system.

Pros:
  • Stability: Blogger.com has been around long enough that it is very stable, especially with Google’s support.
  • Monetization: Making money via Google AdSense is easy thanks to its simple integration.
  • Simplicity: It’s a very simple platform to understand, even for beginners with no experience.


Cons:
  • No Customization: What you see is what you get, and you can’t customize Blogger even if you change the back-end code. It’s also tough to set up your blog with your own domain name.
  • Lack of Style: Themes and designs on Blogger are limited, and there are no plugins for additional functionality or features.
  • Lack of Support: There is little community support on Blogger in contrast to the larger developer community on WordPress.

The Bottom Line
If you’re looking for a platform to share your written thoughts but do not want to pay for the flexibility of hosting your own blog, I recommend Blogger.com. It’s one of the best free blogging sites for casual bloggers and you’ll have a blog setup within 15 minutes. Just be mindful that changing your mind later and converting your blog to a self-hosted WordPress site will cause hardship.


Tumblr.com:
Tumblr is known for informal micro-blogging, a form of blogging that is longer than a Tweet but not as long or professional as a full-blown article or post. Tumblr users share content that is mostly visual: pictures, videos, links, and/or infographics. A Tumblr account is ideal for first-time users looking to start posting instantly, but not commit to a full-time project.

Pros:
  • Easy To Start and Post: You can start a Tumblr blog in less than 5 minutes, and all you have to do to publish something is pick your post-type (image, video, link, or text), input your content and click “Publish”.
  • Multiple Blog Management: Tumblr’s basic Control Panel makes managing multiple blogs effortless.
  • Themes Options: Tumblr has a huge array of beautiful themes to choose from.
  • Mobile Friendly: The Tumblr blogging platform is mobile friendly via dedicated smartphone apps, supporting a blogger’s desire to post on-the-go using SMS, email, or audio message.

Cons:
  • Not Optimized For Text or Writing: Tumblr’s design is so highly visual that text-heavy blogging is discouraged. If you are interested in building a high traffic website focused on written content, Tumblr should be your last choice. Otherwise, Tumblr can be a great choice for a humor blog utilizing memes, images and/or videos.
  • Security: Tumblr lacks good caching and anti-virus plugins. This can result in a slow loading or hacked site.
  • Devalued Content: Tumblr’s heavy emphasis on sharing tends to devalue original content found in more traditional blogs, especially textual content.


The Bottom Line
Tumblr is the best free blog site for casual bloggers who specialize in visual content (humor, photography, food, art, etc.) and have no interest in looking professional.


Best Blog Sites:
Ultimately, when comparing WordPress vs Blogger vs Tumblr, WordPress’s software provides the best value. There are many reasons a majority of bloggers choose to start a blog with WP – it offers the best combination of features, design, flexibility, power, and user-friendliness. Blogger and Tumblr are easy to use, but they lack the features and customization choices of WordPress.

How To Unblock Yourself From Someone's Whatsapp Account

How To Unblock Yourself From Someone's Whatsapp Account

Are you blocked by someone on WhatsApp? I know this sounds irritating to ask if you are blocked by someone. But don’t worry Tahir Khan is always there to help you, almost everyone who use WhatsApp regularly may get blocked by someone due to some personal reasons or without no reason. If you are one of them who got blocked by your crush or any other friend, then no need worry anymore. Because now you can unblock yourself without knowing the person who have blocked you. The following trick will guide you to how to get unblocked on WhatsApp.

How To Unblock Yourself From Someone's Whatsapp Account

Follow These Below Steps -

  • Open WhatsApp on your device
  • Go to settings
  • Hit on the Account Tab
  • Now Enter your Phone number and Click on delete my account
  • Now open App manager in phone setting
  • Locate Whats App and uninstall the same
  • Once the app is completely uninstalled from your device , restart your device/phone
  • Now open Play Store and install whats app again
  • Once fresh installation is completed open the app.
  • Now enter the data required like mobile no ( your phone number ) , OTP etc to start the app .
  • Its done , now you can start texting the user who blocked you in his/her account as you have been unblocked from his/her Whats App account

Hope you’ve unblocked yourself and easily able to text them. But deleting your WhatsApp account will have lead you to forcefully leave all the groups in which you were a member so ask them to add you again. And an important note is that if you’ve the latest version of WhatsApp this work around is not for them. This will only work on the older version.


How to Unblock Yourself from Someone's Whatsapp Account in Urdu/Hindi

Stitched Text Effect in Photoshop

Stitched Text Effect in Photoshop


Introduction:

Over the years as a graphic designer I’ve accumulated a wealth of custom brushes, shapes and actions that I keep carefully organized and labeled for future use. The brush set I’ll be sharing with you today has been in my collection for probably five of six years and every once in a while I’ll find a good reason to load it into my brushes palette. If you’ve never done that before, don’t worry, I’ll walk you through it as we go.

If you’re playing along at home you should download the brush set before we get started.
CLICK HERE and Download Latest Vision Photoshop

Step 1
Lets go ahead and begin by opening a new document in Photoshop. Mine is 540×300 pixels at 72ppi.

Since stitching on a plain white canvas is a little silly, lets go ahead and spice up the Background layer with a little texture. By default the Background layer in any new Photoshop document is locked, so lets go ahead and double-click on the Background layer in the Layers palette to bring up the Layer Properties dialog box. Simply rename the layer or name it Background once again and hit OK to unlock the layer.

Stitched Text Effect in Photoshop


Step 2
Now that our Background layer is unlocked we’re going to add a Pattern Overlay Layer Style to it which will give us a quick and easy denim background to work with.

Control-Click (PC: Right-Click) on the Background layer in the Layers palette and choose Blending Options from the menu. This will bring up the Layer Styles dialog box. Click on the Pattern Overlay text in the left column. (You must click on the text and not on the checkbox. Clicking the checkbox will turn the style ON but it won’t give you the options for the style, so it is important to click on the text so we can modify the Pattern Overlay style options.)

Next we need to load a new set of Patterns into the Pattern Picker. Click on the Pattern swatch to reveal the Pattern Picker, then click the little circle with the arrow in it at the top right corner of the picker. Choose "Patterns 2" from the list and click OK to load the new pattern set into the Pattern Picker. Now simply click on the Denim swatch which is the 4th pattern in the set and click OK to close the Layer Styles dialog box and commit the style to the layer.

Yes, I know, this graphic is a mess… but hopefully it gets the point across.

Stitched Text Effect in Photoshop


Step 3
You should now have a background full of denim and a layer style icon in the Background layer of the Layers palette.
Stitched Text Effect in Photoshop


Step 4
It’s now time to add some text to our document. Press the D key to reset the foreground color to black, then press the T key to invoke the Type tool. Click on the stage to place the cursor and type some text onto it. Notice that when you added the text that Photoshop automatically added a new layer for it.

(*note: To commit the text you can either press the Enter key on the 10-key corner of your standard keyboard or click the Check-Mark in the Text Tool options bar at the top of Photoshop.)
Stitched Text Effect in Photoshop


Step 5
Now that our text is created and while we still have the Type tool chosen we need to create an outline path of the letters. Control-Click (PC: Right-Click) on the text on the stage and choose Create Work Path from the menu. This will create a white outline around each letter indicating that you’ve created a work path (obviously) which we will use later in the lesson to stitch around.
Stitched Text Effect in Photoshop


Step 6
Add a new layer above your text by clicking the Add New Layer icon at the bottom of the layers palette or by using the keyboard shortcut Command-Option-Shift-N (PC: Ctrl-Alt-Shift-N). Rename the layer by Double-Clicking on the layers name in the Layers palette. I called this new layer Stitches.
Stitched Text Effect in Photoshop


Step 7
Now it’s time to setup everything in preparation for the stitching, and the first thing we need to do is load the stitching brush set into our Brushes palette. If you haven’t downloaded them yet you’ll want to do it now by clicking HERE. Save the brush set to your desktop or someplace you’ll remember when we go looking for them.

Press the B key to invoke the Brush tool, then bring up the Brushes palette by choosing Window>Brushes from Photoshop’s main menu. In the upper right hand corner of the Brushes palette, click on the options icon and choose Load Brushes from the menu. Navigate to the brush stitches brush set that you just downloaded to your hard drive and click Load. You will then be asked if you want to Append the brushes to the end of your current brushes or if you want to replace the existing brushes by clicking OK. For my example I’m going to replace my existing brushes, but either option works fine.
Stitched Text Effect in Photoshop


Step 8
Now that the brush set has been loaded into the Brush Picker lets go ahead and select the V-shaped brush. We’ll need to make a few adjustments to the settings in the Brushes palette for this brush to make it work the way we want.

First off lets reduce the size of the brush to around 8 pixels in the Diameter setting then make sure the Spacing checkbox is checked and that the spacing is set to around 80%. The spacing change makes the V’s overlap enough to look like interlocking stitches.
Stitched Text Effect in Photoshop


Step 9
While still in the Brushes palette click down to the Shape Dynamics link on in the menu on the left and make sure that the Angle Jitter control is set to Direction. This will make the brush rotate as it goes around the corners to the different sides of our letters.
Stitched Text Effect in Photoshop


Step 10
At last it’s time to make the magic happen. Put on your wizard hat and swap the foreground and background colors by pressing the X key (white should now be showing as the foreground color at the bottom of the Tools palette). Press the P key to switch to the Pen tool and then Command-Click (PC: Right-Click) anywhere on that little white outline that is the Path around the text. Choose "Stroke Path" from the menu, make sure that "Brush" is selected from the drop-down menu and that the Simulate Pressure checkbox is un-checked then click OK.

You’ll now see that the brush we chose has been used to stroke the entire path of the text. Since we’re done with the path now you can either click over to the Paths tab in the Layers palette and delete it, or simply press Command-H (PC: Ctrl-H) to hid it.
Stitched Text Effect in Photoshop


Step 11
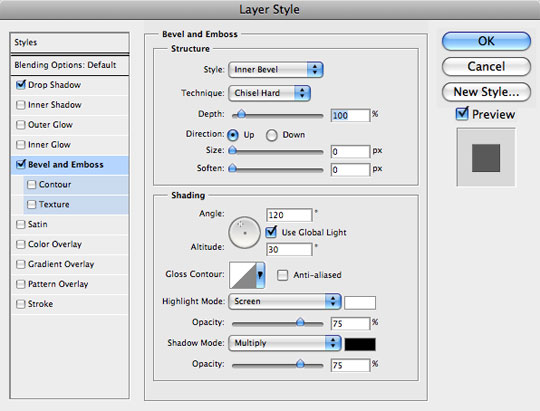
To make the stitches a little more realistic lets go ahead and add a few layer styles to the Stitches layer. Just like we did in Step #1 lets Command-Click (PC: Right-Click) on the Stitches layer and choose Blending Options. Now add a Drop Shadow and a Bevel and Emboss as shown below, be sure to check each setting to make sure you haven’t missed anything then click OK.

The slight Bevel and Emboss will add a little more dimension to the thread while the Drop Shadow will add a touch of shading around the edges.
Stitched Text Effect in Photoshop


Step 12
Before we move on let me show you a cool little trick to change the background color. Since the background is a preset color pattern and not an overlay we can’t just change an underlying layer color so we have to resort to other methods. Click on the Background layer in the Layers palette to make it the active working layer. Now lets add an adjustment layer by clicking on the Create A New Fill or Adjustment Layer icon at the bottom of the Layers palette (it’s the circle with half black and half white), choose Hue/Saturation and use these settings (or any that look pretty to you).
Stitched Text Effect in Photoshop


Step 13
The last little bit of adjustment I did was to click over to the Text layer in the Layers palette and change it’s Blend Mode to Multiply and it’s Fill opacity to 70%. By doing this we allow a little of the denim texture to come through onto our black letters adding a little depth and realism.

(*note: You could also paste some real fabric into a layer above the Text layer and use a clipping mask to add even more coolness.)
Stitched Text Effect in Photoshop


Step 14
Anytime you’re using a text to create this effect you will always have an outline of the lettering, but what if you just want to stitch letters? Well, if you’ve got a little experience with the Pen tool you can apply this same technique to any number of paths you’ve drawn yourself.

Below I’ve used the pen tool to draw some text.
Stitched Text Effect in Photoshop


Step 15
Then I switched to the Brush tool, lowered the diameter of the brush to 6 pixels, switched back to the Pen tool and Stroked the path just like we did back in Step 10.

I then added the same Bevel & Emboss and Drop shadow to this new layer of stitches as we did to the original text.
Stitched Text Effect in Photoshop


Step 16
In my final image I simply embellished on the techniques we’ve learned. Check out the .PSD download to view all my final adjustments!
Stitched Text Effect in Photoshop


Application failure. hr=0x80040101: Failed to initialize virtual machine

Hi There,

Its 12:30 AM today in Pakistan and i have to do some work with my VMware. Tried to start it in normal and Administrator mode both but WOOOWWW..... ITS CRASHING....! I am getting a very weird error message that even Google did not provide any useful stuff to resolve this issue. Below are my environment details.

OS  :  Windows 8.1 Pro
VM :  VMWare Workstation 11.0.0 build-2305329

Error : Application failure. hr=0x80040101: Failed to initialize virtual machine

(This is not the actual screenshot of my error but the error was exactly same with the above Red text. I forgot to take screenshot of the error message before fixing it.)


I tried registering few DLLs as shared by someone in Chinese language here but it did not help me. So i decided to figure it out myself. Could not imagine that it would be that lucky, simple and tricky. I tried restarting VM Ware services, logging Off an On to system, restarting the machine but nothing helped me. So below is the solution that worked for me.

Solution: I recalled the changes i have done in my physical machine and found that few days back i have installed some automatic windows updates. In some cases, these update can really make a big trouble for you. It was nearly around 100 updates and it was not easy to look for each update to check if that effected VMWare. Luckily i applied a filter on my installed windows updates and uninstalled one of Windows Security Update, restarted my physical machine and then ran again the VMWare Workstation. Boooom..... It worked like a charm.

Meanwhile i decided to write this down to my blog before its too late and i forgot or get lazy to write it down on next day. It may be helpful for someone who is running with the same problem as its very rare error. If the above fix do not work for you, try reinstalling the VMWare Workstation.

 Below is the security update that i have uninstalled and rebooted my machine.


Security Update URL : https://support.microsoft.com/en-us/kb/3170106

Enjoy...!

How to Find WiFi Password of Own Network

How to Find WiFi Password of Own Network

In this tutorial i will guide you you How to Find WiFi Password of Own Network. Usually we all know password of our own wifi network. But what if you forget password of your own network? Whenever you connect your device to any wi-fi network then it’s password get saved into your device until you disconnects it. But it cannot be seen directly from your device. You need to follow some steps to find wifi password of your current network. Though it’s not a big deal to recover password of current network. 


HOW TO FIND WIFI PASSWORD OF OWN NETWORK
Finding WiFi password of own or current network is not a big deal you just need to follow some simple steps to get access to password of your own network. However, the wifi PIN can be extracted from the device in which WiFi network is connected. Which can be helpful to recover password of current wifi network. You must read this post once as you may require it any time when you forget password of your wifi. To know more about this refer to below post.


TRICK TO RECOVER WIFI PASSWORD OF CURRENT NETWORK

  • In your Pc or Laptop press windows button then search for cmd and Run it as Administrator.
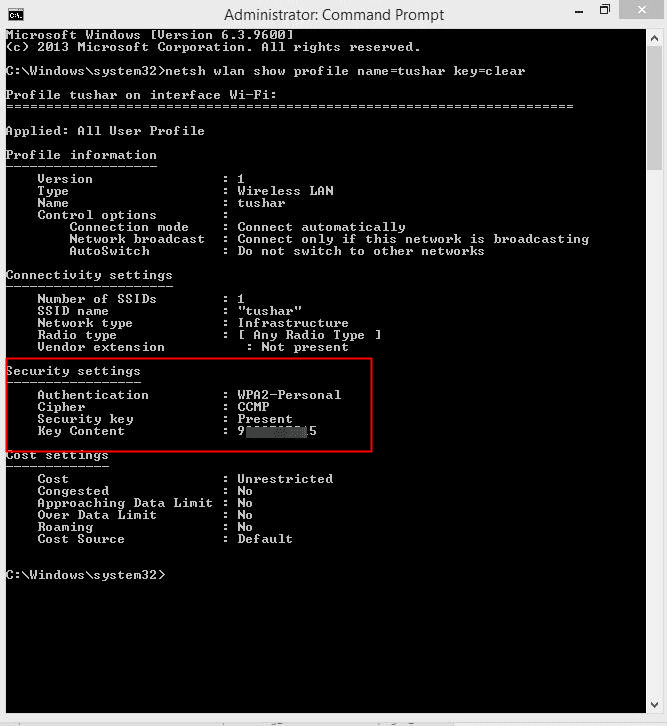
  • Now command prompt will appear and type following code in this netsh wlan show profile name=TechCrack key=clear (where you need to replace TechCrack with your network name) and hit enter button.

How to Find WiFi Password of Own Network


  • That’s it, Now it will show you password of your current wifi network.
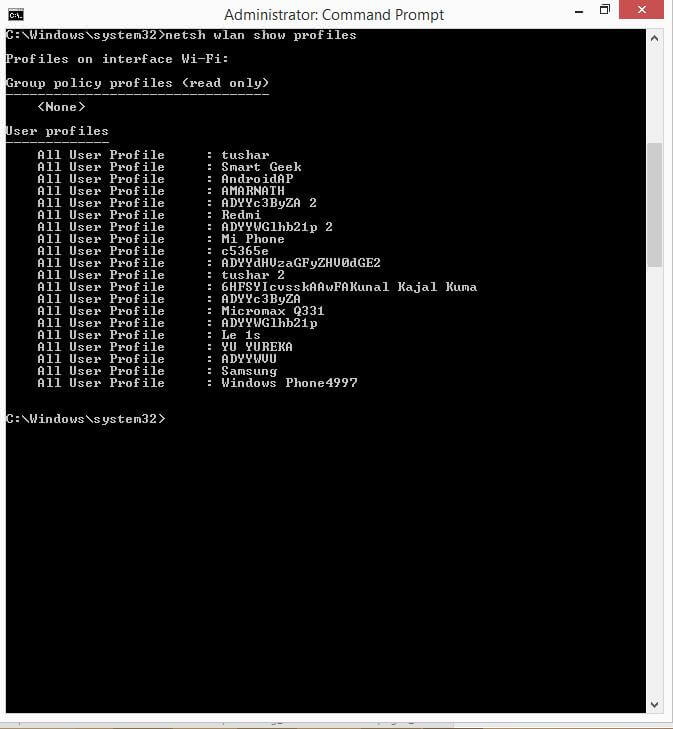
  • If you want to see password of your previous wifi networks then you need to enter this command “netsh wlan show profiles” and hit enter.

How to Find WiFi Password of Own Network


  • That’s it, By this command you can access to passwords of your previous wifi networks too.