Showing posts with label Tutorial-Photoshop and PSE. Show all posts

CoffeeShop "Action Merge Magic" Photoshop/PSE Action!


Happy Halloween!!!  Today I have a really practical action to share with you. How many times have you ran one of my actions on your image and found the enhancement to be too dramatic? Well, I have written a new action to solve this problem!

After you run any of my CoffeeShop actions on your image, run this "Action Merge Magic" action. It will merge all of the edited layers into one layer while retaining the original image on the bottom. Then you can simply adjust the opacity of the enhancement to taste! Or you can paint on the layer mask to selectively remove part of the enhancement.

It might sound confusing, so let me show you with screenshots. :-)

I used this original dog, male on road, and girl image in today's tutorial.


This is the original image.


I ran my "Cashmere Rose" action on the image and adjusted the layers to taste. This is nice, but I would prefer to have a more subtle edit.


So I ran today's new action "Action Merge Magic" on the image. It merged all of the layers into one layer with a layer mask while retaining the original unedited image on the Background. Then I dialed down the opacity of the "Edited Image" layer to 65%. I think this is the perfect amount of Cashmere Rose for this image. :-)

Here is another example.


Here is the original image.


I ran the CoffeeShop "Moody Pop" action.


Then I ran "Action Merge Magic" and turned down the "Edited Image" layer to 70% and also used a soft low opacity black brush on the layer mask to add some light to the center of the image.

If a layer is not turned on, it will not flatten and you will see it above the "Edited Image" layer. Just ignore it. :-)

Download the CoffeeShop "Action Merge Magic" Photoshop/PSE Action. You can also download it here.

Do you want to download my favorite CoffeeShop PSE/Photoshop Actions and Lightroom Presets or Design Elements in one convenient zipped file AND help support this blog? Just click here for my action pack or here for a download of some of my most popular design elements, storyboards, and textures.

For complete info on installing all of my actions, click here.


More from Rita:
Facebook | Instagram | Pinterest | Twitter

CoffeeShop "Moody Monday" Photoshop/PSE Action!


Today I have a brand new beautiful fine art action called "Moody Monday". This fully-adjustable action has an optional Matte-Effect layer and looks amazing on many types of images including portraits, landscapes and still-life.

A special thanks for the stock images from Pixabay used in my examples (bride, flowers, portrait, posing lady).

CoffeeShop "Moody Monday" Photoshop/PSE Action Tutorial:


This is the image with no adjustments.


I marked the layers adjusted with red. I used a black soft brush to remove the "Darken" layer off the woman and then turned down "Darken Shadows" and "Brighten Whites" to 50% opacity.

This type of enhancement can look really stunning on fall and winter portraits. 

Download the CoffeeShop "Moody Monday" Photoshop/PSE Action. You can also download it here or grab it in my convenient download pack.

Do you want to download my favorite CoffeeShop PSE/Photoshop Actions and Lightroom Presets or Design Elements in one convenient zipped file AND help support this blog? Just click here for my action pack or here for a download of some of my most popular design elements, storyboards, and textures.

For complete info on installing all of my actions, click here.


More from Rita:
Facebook | Instagram | Pinterest | Twitter

CoffeeShop "Cashmere Rose" Photoshop/PSE Action Set!


Today I have a beautiful new action set called "Cashmere Rose". This action is completely adjustable and adds beautiful light and color to your images.

This download contains two actions, the original "Cashmere Rose" action will all of the layers, and "Cashmere Rose Mini" that flattens the edit and allows you to adjust the final opacity of the enhancement.  See below for screenshots.

All of the images I have used in this post (except for the one of my boys below) can be found on Pixabay or Unsplash. (Girl, Man and Child, SplashRoses, Pink Dress)


"Cherry Blossom" original (+ CoffeeShop Cashmere Rose and soon-to-be-released CoffeeShop Fine Art Texture)


"Woman" original (CoffeeShop Cashmere Rose + Flypaper Textures "Tempest Painterly" texture)


My boys


CoffeeShop "Cashmere Rose" Photoshop/PSE Tutotial:


I turned on the "Recover Highlights" layer so her dress would not be blown out. And I adjusted the "Matte Effect" layer (see screenshot above). If you want to adjust the "Matte Effect" Levels adjustment layer, you can find detailed instructions on this post.

CoffeeShop "Cashmere Rose Mini" Photoshop/PSE Action Tutorial:


Original image from Unsplash.


Image after "Cashmere Rose Mini".  I adjusted the enhancement to 85% opacity.

Download the CoffeeShop "Cashmere Rose" Photoshop/PSE Action Set. You can also download them here.

Do you want to download my favorite CoffeeShop PSE/Photoshop Actions and Lightroom Presets or Design Elements in one convenient zipped file AND help support this blog? Just click here for my action pack or here for a download of some of my most popular design elements, storyboards, and textures.

For complete info on installing all of my actions, click here.


More from Rita:
Facebook | Instagram | Pinterest | Twitter

{Friday Photo Bliss}: Macro Nifty 50

It has been hot as Hades most of the summer, so I haven't been out shooting with my "real" camera much. However, I started to miss her and even though the heat index has reached 100 this week, I decided to pull out my dusty beloved big camera and practice shooting manual.

I remembered this "Nifty Fifty Macro" tutorial I wrote years ago and decided to create some fun macro images.  These images don't have the sharp focus of a real macro lens, but personally I love the tilt-lens artistic vibe coming off them. ;-)

All of the images below were shot in my backyard in hot, humid conditions with a 80-pound puppy following me around everywhere. Try taking a macro photo of a tiny flower when your giant puppy keeps on trying to lick your lens.

I used the new Pretty Presets "Pretty Film Pastels Collection" presets on all of these images. I love these presets, and found they work on so many different types of images, not just portraits.  My favorite for these edits was "Warm Blush". You can still grab them on sale for only $34 this week.

I also used the new gorgeous textures from the Flypaper "Tempest Painterly" Texture set on many of my images below.

If you have a less-than-stellar macro image (because you are shooting with a cheap but amazing 50mm lens that is backwards on your camera!), I use a little editing trick to turn it into something special. Make a copy of the image in Photoshop and apply a high pass filter of 10-20 to that copy, and put the layer in overlay or soft light blending mode. Then add a texture to the image in soft light or overlay blending mode.


 This is my absolutely favorite one of the set.


This was growing on one of our fire-pit logs.


We have a few trees (well, it is actually a bush) that have colorful fall leaves.


I took about 10 shots of this little tiny weed flower and just happened to get a perfect one with my little ant friend.


I have a few roses left on my deer-eaten rosebushes.


This final image was taken with my Nifty 50, but this time I tried the free-lensing technique. I need a lot more practice, but it is so fun playing with my lens!

Do you want to download my favorite CoffeeShop PSE/Photoshop Actions and Lightroom Presets or Design Elements in one convenient zipped file AND help support this blog? Just click here for my action pack or here for a download of some of my most popular design elements, storyboards, and textures.

For complete info on installing all of my actions, click here.


More from Rita:
Facebook | Instagram | Pinterest | Twitter

CoffeeShop "Golden Afternoon Bliss" Photoshop/PSE Action!


Today I have a new action that I think you will really love using on your own images. I call it "Golden Afternoon Bliss" which describes the edit pretty well. This action is absolutely gorgeous on fall images/portraits but also looks stunning on so many different types of images, giving them a beautiful warm artistic edit. It also enhances the yellows/reds/oranges/greens in your image and has an optional Matte Effect layer.

I have other fall-inspired actions and designs, and you can also download my "Fall Frenzy" action which I posted last week.

I used several gorgeous images from Unsplash on this post (forest, couple walking, ferris wheel, running on beach, field of grass).

NOTE: You might have noticed I changed the name of this action a few times in this post, but I was too lazy to make new screenshots. :-)

If you want to download this action along with hundreds of my other actions in one download and help support my blog, you can grab them all here. A perk of purchasing my download packs is you get free updates up to two years after your purchase, and I usually update the packs weekly!!! Plus the download pack includes premium actions that aren't posted for download here on my blog.


CoffeeShop "Golden Afternoon Bliss" Photoshop/PSE Action Tutorial:


I am going to walk you through how I edited this beautiful original image.


 I ran "Fall Late Afternoon" and this is what the image looks like without any adjustments.


One of the nice things about this action is that it allows you to add a gorgeous warm tint separately to the highlights and shadows of each image. I clicked to turn on the "Golden Afternoon Deluxe (shadows)" layer.


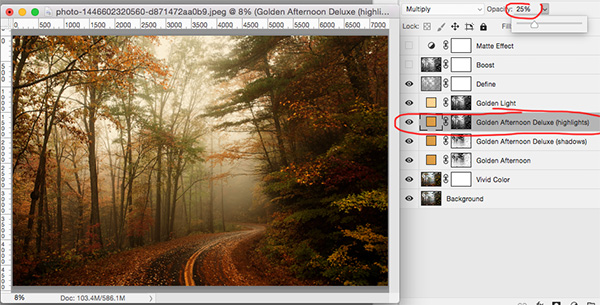
Next I clicked to turn on the "Golden Afternoon Deluxe (highlights)" layer. It is set on 40% opacity.


I dialed it down to 25% opacity. I think the sky looks amazing now. But I find the shadows are too red.


So I went back to "Golden Afternoon Deluxe (shadows)" and turned the opacity from 40% down to 15%.


I didn't turn on "Boost" because I didn't need any extra contrast, but I did turn on the "Matte Effect" layer and opened the Levels adjustment pane. If you want to fine-tune this layer, move the Shadows and Output Levels slides to taste (circled above).

These setting should be adjusted to each image, and I wanted to show you how I go back and forth and play with opacities and such until I am satisfied with the edit.

Download the CoffeeShop "Golden Afternoon Bliss" Photoshop/PSE Action. You can also download it here.

Do you want to download my favorite CoffeeShop PSE/Photoshop Actions and Lightroom Presets or Design Elements in one convenient zipped file AND help support this blog? Just click here for my action pack or here for a download of some of my most popular design elements, storyboards, and textures.

For complete info on installing all of my actions, click here.


More from Rita:
Facebook | Instagram | Pinterest | Twitter